UK
UK FR
FR DE
DE IT
IT ES
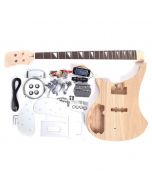
ESBASS KIT USER GUIDE - RICKENBACKER
- The Guitar Fabrik
- GUITAR KIT USER GUIDE
- Aug 21, 2024 views
- 1851

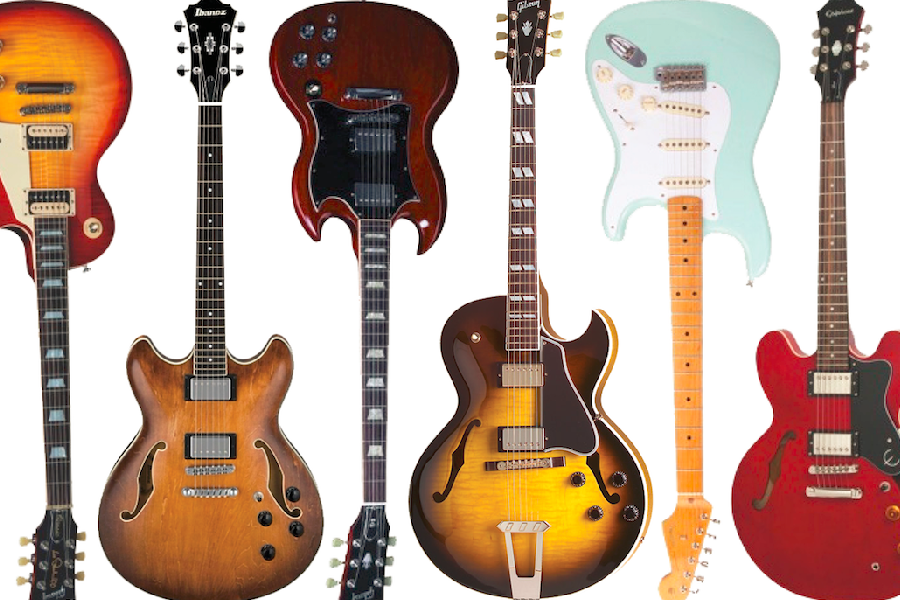
In this comprehensive user guide, we will walk you through the process of building a guitar from our Rickenbacker bass guitar kit. If you're still choosing your next project, take a look at our for more inspiration. We will cover the following key steps:
- Understanding the Rickenbacker Guitar Bass Kit and Preparing Your Workspace: Learn about the components of the Rickenbacker bass kit and how to set up your workspace for optimal results.
- Painting Your Bass Body and Neck: Discover various techniques for painting your Rickenbacker guitar, including dye, varnish, and Tru-Oil with a spray can. This section provides an overview, and additional detailed guides on using our guitar painting set are available.
- Assembling the Rickenbacker Bass: Get step-by-step instructions on assembling the various parts of the bass body, with a special focus on neck integration. We'll also explain important concepts such as scale length and neck inclination.
- Adjusting Sound and Playability: Learn how to fine-tune your guitar's sound and playability by adjusting string action and intonation. We'll cover essential adjustments like bridge setup and truss-rod adjustment.
By following this guide, you'll be able to build a fully customized and high-quality Rickenbacker-style bass that is ready to play.
RICKENBACKER KIT LEVEL OF DIFFICULTY AND CHALLENGES
The Rickenbacker Guitar Bass Kit is ideal for intermediate level due to the following reasons:
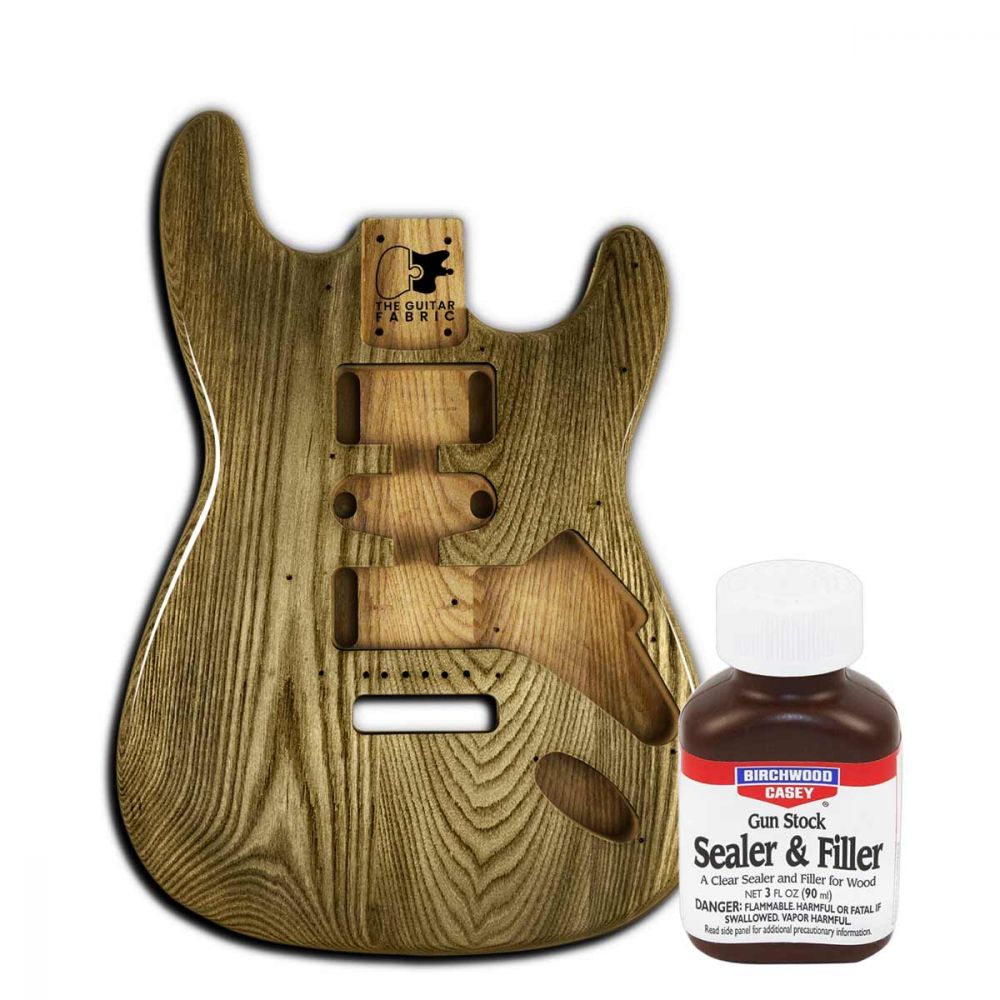
- Painting the Guitar Kit - Intermediate: The ash wood of the bass body is very porous. It will require at least two coats of grain filler for a smooth finish. The intricate curves and surfaces of the body need extra attention to ensure you don’t create any drips.
- Assembling the Guitar Parts - Intermediate: The neck is set-in, making it slightly more complex to integrate than a bolt-on. Ensure to check scale length, alignment, and string action before gluing as it cannot be undone. The ash wood is hard, so be sure to pre-drill before screwing. Wiring is straightforward with our solderless system. The bridge needs to be positioned, meaning that you need to measure scale length, etc., but it remains straightforward.
- Adjusting Sound and Playability - Intermediate: The main concern is the neck, which you cannot remove once glued. So, please check string action and scale length before gluing. The bridge is a high-mass bridge commonly used on bass guitars. It has fully adjustable saddles for intonation and string height. The nut can be easily removed for customization. The lack of neck inclination simplifies the initial string action setup.
LIST OF TOOLS TO BUILD YOUR GUITAR KIT
Are you ready to transform your DIY guitar kit into a stunning masterpiece? Before you pick up that brush or spray can, make sure you're equipped with the essential tools and insights that will set you up for success. Achieving a professional-quality finish requires careful preparation, and our comprehensive guide is here to walk you through the process step by step.
Gathering the right tools is the first step to ensuring a flawless finish. While you can always explore more advanced techniques as you gain experience, we've outlined the strictly necessary tools you'll need to paint and build successfully one of our guitar kits.
Essential Tools for Building Your Guitar Kit
| Tool | Description | Image |
|---|---|---|
| Screwdrivers | During the installation of all the parts—mechanics, pickups, pickguard, bridge—you will install many screws. Therefore, we suggest a good and robust screwdriver to make your life easier. |  |
| Hand Drill (or Drill Press) | While all the cavities are made, our guitar kits have pre-drilled only tune-o-matic bridge and body neck pocket for a bolt-on guitar kit. Therefore, you will need to pre-drill using a wood drill before installing any parts. This step is really important to avoid breaking any screw in the hard solid wood of our kit and to allow accurate positioning of the various guitar parts. It can also be helpful for screwing as long as you control the rotation of your hand drill. | 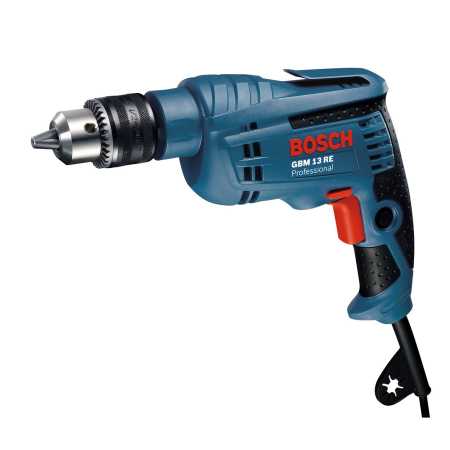 |
| Copper Tape | We strongly advise installing copper tape in the wiring cavities as it removes electromagnetic interference and enhances the sound quality of the guitar. | 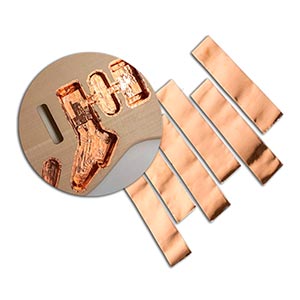 |
| Wood Glue (for set-in guitar neck) | For guitar kits with a set-in neck, you need to glue the neck to the body. For this, wood glue such as Titebond is required. |  |
| Clamp (for set-in guitar neck) | If your selected guitar kit has a set-in neck, you need to glue the neck and clamp it for 48 hours. Make sure your neck is well integrated with the body. In particular, check the scale length, alignment, and string action (not discussed further in this section). Remember, once the neck is glued, it is nearly impossible to remove it from the body! | 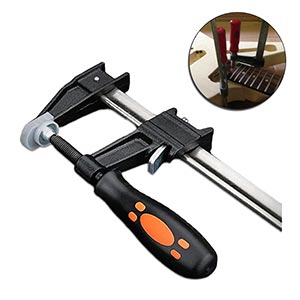 |
| Files (optional) | Files are not absolutely necessary but are useful for some simple and slight adjustments of your guitar kit. | 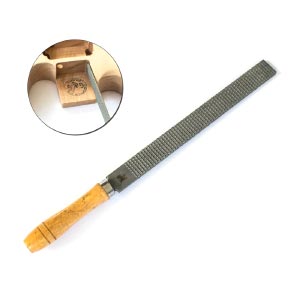 |
Tools for Painting & Finishing Your Guitar
| Products | Description | Image |
|---|---|---|
| Vacuum or Air Spray | This is optional. But remember that you will need to remove the dust during the sanding phases. | 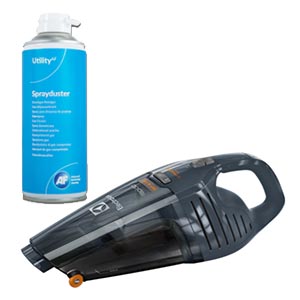 |
| Masking Tape | Masking tape is needed to mask off specific areas you don't want to paint, such as the fretboard or bindings. | 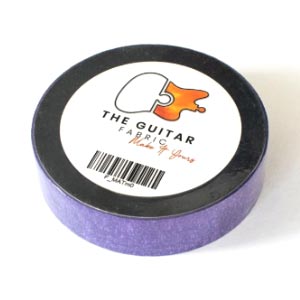 |
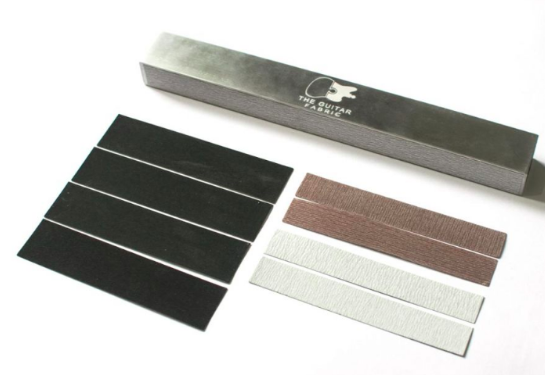
| Sanding Paper Set (wet) | During the various phases of the guitar finish, prepare the guitar's surface with varying grits, including 400, 600, 1000, 1500, and 2000. This will allow for a smooth result and ensure that previous paint coats adhere well to the new one. | 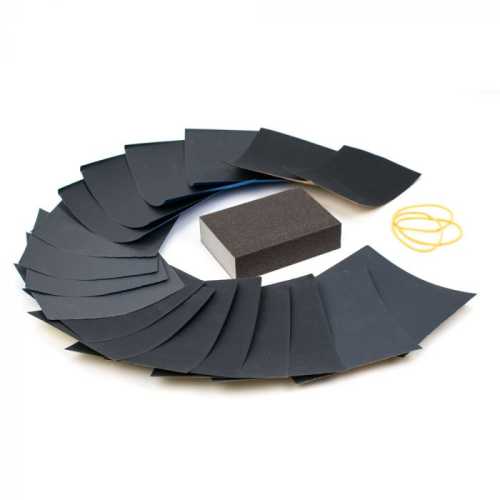 |
| Grain Filler (optional) | The grain filler—optional—will be used to close the open pores of the wood. Note that ash and mahogany fit in the open-pore wood category but not maple wood. Grain filler can also be used to stain your wood or create special effects such as the ceruse effect. | 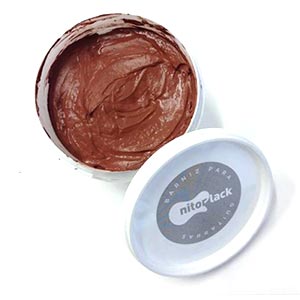 |
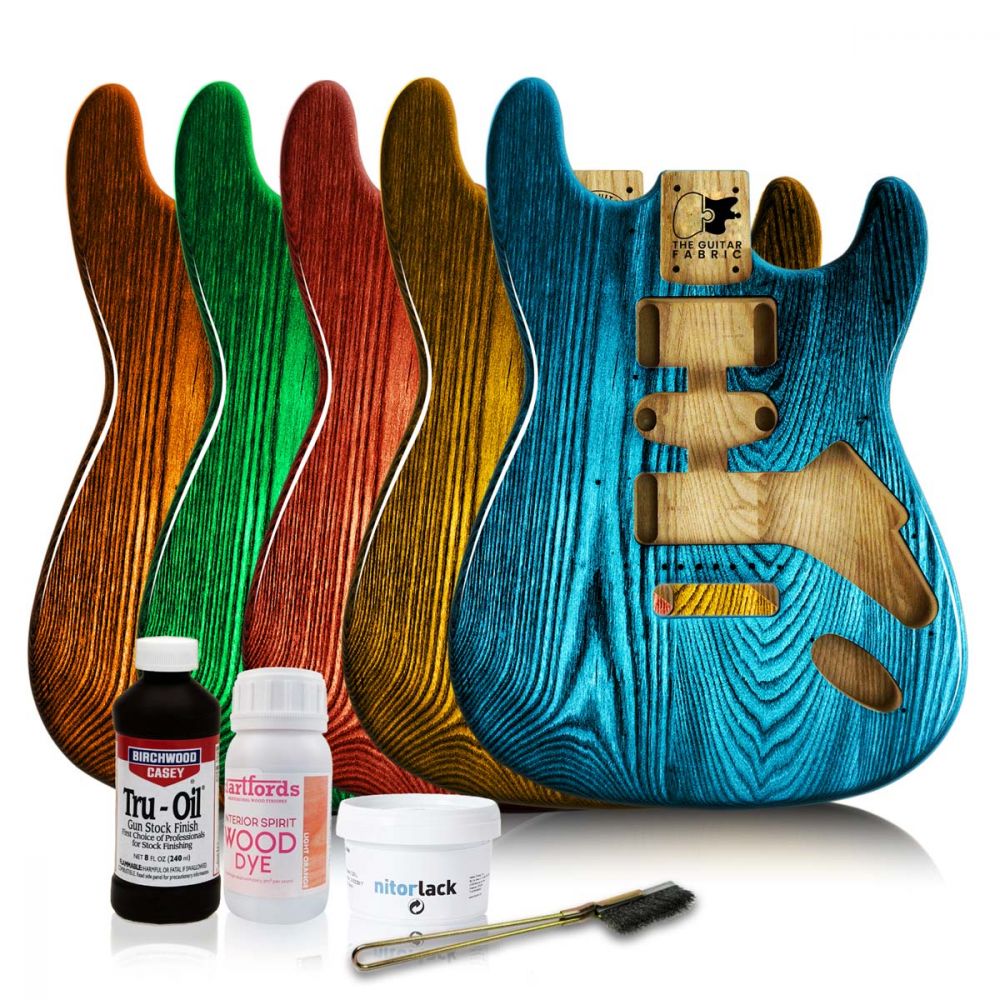
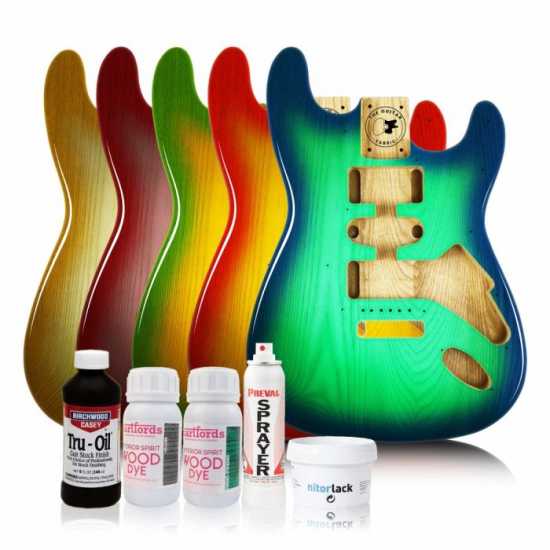
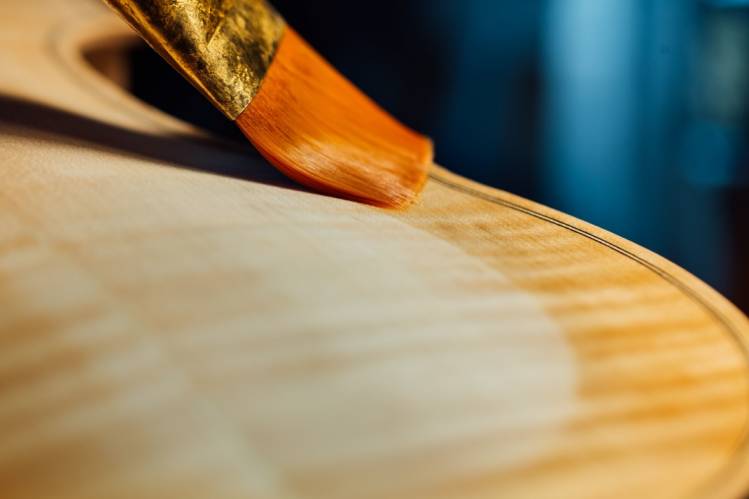
| Paint or Dye (optional) | Using dye on wood accentuates natural grain patterns, offers color customization, and maintains transparency for a subtle look, while paint provides complete coverage, ensures consistent color, and offers protection against damage. Depending on your selected product, you might also need a brush or cloth to apply the paint (if you don't use a spray can). You might also want gloves or even a respiratory mask to protect yourself if you use Nitrocellulose and paint in a place that is not well-ventilated. | 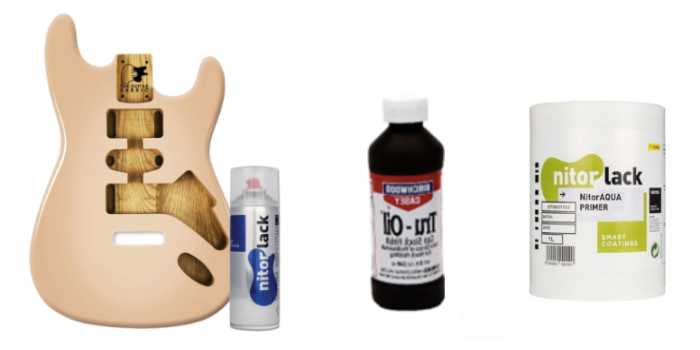  |
| Varnish or Tru Oil for top coat | Varnish or Tru Oil provides a robust layer that shields wood from moisture, UV rays, and daily wear, preventing damage such as warping or rotting. It maintains the quality of the wood over time. It also enhances the wood's appearance by highlighting its natural beauty and grain patterns, offering a glossy, semi-glossy, or matte finish. Note that proper surface preparation and application are vital for optimal results. | 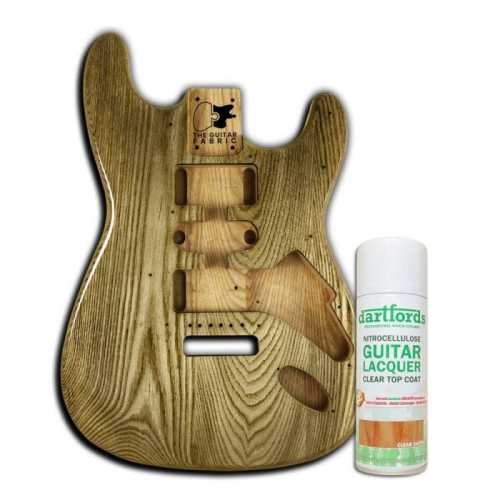 |
For simplicity, you can also select one of our ready-to-use painting sets that match what you want to achieve. It will contain all the products—grain filler, dye or paint, and varnish—for you to achieve what you desire.
For advanced builds and creating a highly professional guitar, there are other tools to consider, such as fret leveling beams, string action gauges, and polishing pads. However, these are not absolutely necessary, and you can already achieve a great guitar using our guitar kit and the products and tools defined above. The usage of other tools will be discussed in another topic for advanced builders.
PREPARATION BEFORE STARTING THE GUITAR BUILD
Painting and constructing a high-quality guitar is achievable for anyone who diligently follows the steps involved in guitar building. One of the very first steps is to inspect your kit to familiarize yourself with it and ensure everything is as expected. Therefore, we strongly advise you to conduct an overall check-up of your guitar kit:
- Familiarize Yourself with the Kit: Examine the various parts and understand their placement. And don't forget to keep track of those screws!
- Overall Quality Check on the Neck and Guitar Body
- Inspect for any glue stains, particularly on flamed, quilted, or spalted maple tops. If you find any, remove them using 400/600 grit sandpaper. Gradually sand and check for stain removal until the guitar's surface is flawless.
- Examine the fretboard, frets, and wood in general to ensure there are no cracks.
- Neck and Body Pre-assembly - further detailed in the neck-to-body integration article.
- Attempt to assemble the body and neck to ensure a proper fit. Ideally, install the bridge and position two strings or thread to represent the two E strings. This initial step helps you check alignment and string action (later steps will address string action in more detail, but it's beneficial not to be too far off initially). As noted, this is particularly important if you have chosen a guitar kit with a set-in neck.
- Wiring and Pickup Testing - discussed in the guitar wiring article
Next, you need a clear idea of the finish you want for your body and neck. This should correspond to the products you have already selected, such as a finishing kit.
Finally, prepare a workspace and gather the tools you might need as described in the article List of Tools to Build Your Guitar. Allocate space where you can work on your guitar kit for approximately 1 week to 1 month, depending on your availability. The painting process can be time-consuming due to the drying time required for different layers of stain, varnish, etc. Ideally, have a space where you can leave your work during the entire finishing process. Your workspace should be clean and free from dust to achieve a smooth paint result. Paint outside only if necessary, as insects attracted by finishing smells may stick to your finish.
We also recommend allowing the wood to rest for 2 days at room temperature and humidity to stabilize its density.
OVERVIEW OF THE STEPS TO PAINT A GUITAR
Creating your own guitar is a gratifying journey that demands meticulous attention to detail. While the essence and performance of the instrument remain unaffected, a premium finish becomes a testament to your craftsmanship. This guide provides a high-level overview of the process for achieving a high-quality finish for your guitar. Each painting step will be discussed in detail in other articles. Below are the general steps to paint a guitar:
- Working environment
- Wood preparation
- Grain filling application: only for open-pore wood (ash or mahogany)
- Primer / Sealer: optional if using dye or if the wood has been grain filled.
- Dye / Color paint coat: for wood coloration
- Varnish: absolutely needed to protect the wood. It can be a water-based varnish, nitrocellulose, Tru-Oil, or other varnish types.
- Polishing: optional, it allows a super gloss mirror finish with further protection (against UV, for instance)
Define Your Design
The very first step is to think and clarify how you want your guitar to look: are you looking for a natural finish with only varnish? Translucent? Opaque or metallic? A special effect? Once you decide, you need to assess which type of products will be the best to achieve your goal. Is it better to use nitrocellulose, polyurethane paint, water-based options, dye, or Tru-Oil? You can read our specific articles to help you decide.
Wood Preparation
Before diving into the finishing process, some crucial preparatory steps must be taken:
- Check for Glue Stains: Carefully examine your body and neck wood for any glue stains. Ensure a clean state before proceeding, as glue residue can mark the final outcome. Glue stains can be easily removed by gently spot sanding by hand using 600/800-grit sandpaper until the glue stain is no longer visible.
- For veneer such as flame, quilted, or spalted maple tops: if you decide to use dye and stain your body, use only a small amount of dye at each pass to prevent over-soaking and the formation of blisters.
- Wood Sanding: Begin by sanding your guitar neck and body. Although your kit arrives sanded at P180 grit, further sanding to P240 and P400 is ideal for a smooth base. Employ rotating sanders—if you have one available for flat surfaces—and hand sanding for curves and intricate areas.

Perfecting the Canvas: Grain Filling
For open-pore woods like mahogany or ash, applying grain filler is essential to achieve a smooth and clean finish and avoid expensive paint consumption. Using a grain filler permits the filling of the wood's pores:
- Use a plastic card, old credit card, or a cloth to apply grain filler to open pores.
- Scrape off excess filler meticulously to avoid hardened residue. Lightly sand with P600 for a refined surface.
- Check the surface closely. Apply grain filler again in regions where the wood pores have not been properly filled, following the same process. Normally, no more than two coats of grain filler are needed.

Note that grain filling guitar wood is not necessary for maple, basswood, rosewood, and ebony.
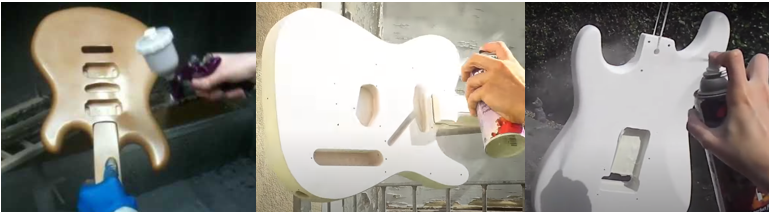
Building the Foundation: Priming and Painting
Primer and paint contribute to a robust foundation for your finish:
- Primer: Apply primer, although it is not mandatory if you have already grain filled or your wood has its pores closed, it will save you paint and lead to an even smoother finish.
- Color Lacquer: Aim for 2-4 coats for desired color intensity. With nitrocellulose, sanding between coats is unnecessary unless drips or runs are present.
- Neck Color Coat: Tailor your neck's finish according to your preference—whether it's natural, vintage, or painted.
Varnishing for Protection and Luster
The varnishing step not only enhances your guitar's appearance but also shields it over time:
- Body Varnish: Employ the same spraying technique used for color coats. Apply 4-6 varnish coats, allowing a week's drying time before polishing.
- Neck Varnish: Prepare for varnishing by carefully masking areas like the nut, binding, and fingerboard; consider avoiding varnish on the fingerboard due to potential stickiness. Remember safety measures when using spray paint. Anticipate a total of around 4 to 7 coats for a complete finish. The use of a grain filler and/or sealer will reduce the number of coats needed.
Note that between coats of paint and varnish you might need to sand from P600 to P1200. Read specific articles on the subject for more information.
Achieving the Final Shine: Polishing
Polishing is optional but contributes to a mirror-like gloss:
- Sanding: After a week of varnishing, lightly sand with non-loading 1200-grit sandpaper. Use a rubber eraser to maintain the contours while sanding with the grain.
- Fine Sanding: Follow up with 1200-grit sandpaper, using water and dishwashing detergent as a lubricant. This removes previous sanding marks.
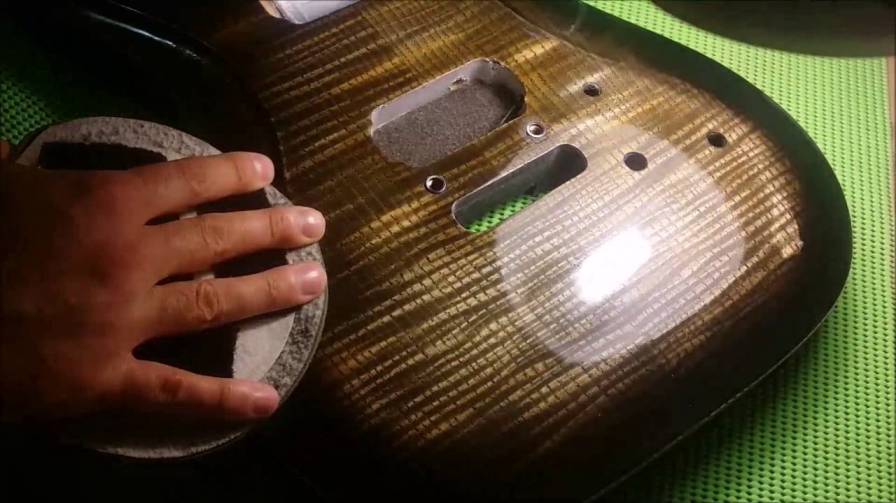
Elevating the Shine: Polishing Compound (Optional)
- Sanding Alternative: Instead of proceeding with fine sanding, you can opt for a polishing compound to achieve a brilliant finish.
- Application: Apply the polishing compound sparingly, using gentle pressure initially. Gradually reduce pressure as the gloss intensifies.
- Progressive Grits: Employ polishing compounds with varying grits, starting from around 1000 and progressing to 2000-2500.
Your Immaculate Creation
This is high-level information if you want to paint your guitar in a standard way. However, additional clarification will be needed if you want to dye your guitar or aim for specific finishes as proposed in our guitar paint set products. Read our other articles or the painting user guide for further clarification on each step. Remember, our online store offers a range of finishing products, ensuring compatibility and providing the best quality-price balance. Our experts are always available for any clarification needed. Happy building and creating your masterpiece!
MEASURING SCALE LENGTH FOR BRIDGE POSITIONING
When assembling a guitar kit, achieving precise bridge positioning allows for optimal playability and sound. Central to this process is understanding and measuring the scale length—a fundamental factor that affects intonation, string tension, and overall performance.
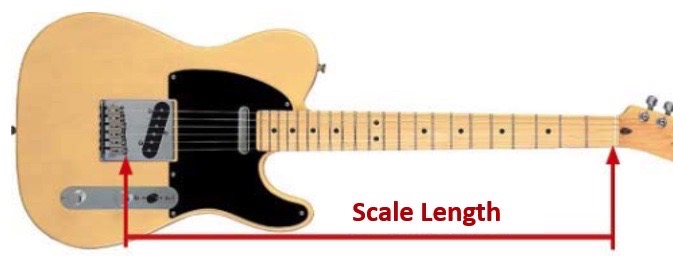
What is Scale Length?
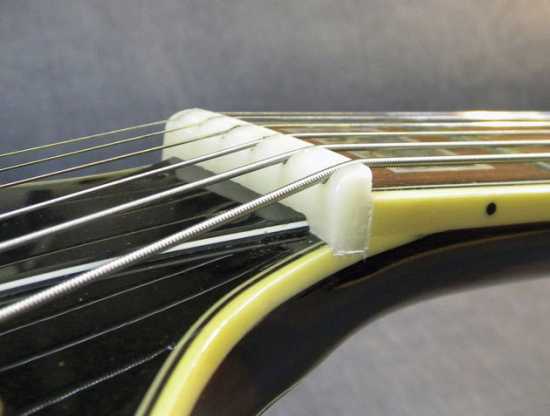
Scale length refers to the distance between the nut (at the headstock) and the bridge's saddle, where the strings make contact. It is measured at the high E string position as shown in the picture above. This measurement significantly impacts various aspects of your guitar's performance, such as fret spacing, string tension, and intonation. To achieve consistent playability across the fretboard, it's vital to maintain the correct scale length.
Measuring Scale Length
To measure the scale length of your guitar kit, follow these steps:
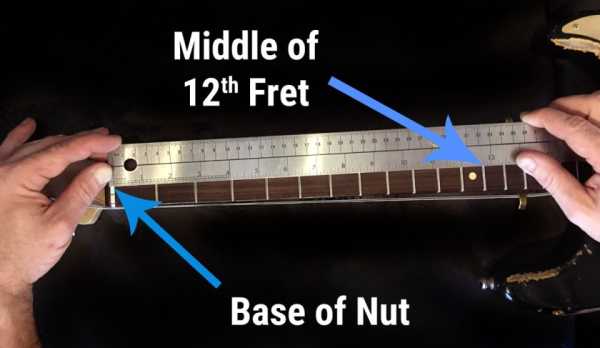
- High E String Measurement: Measure the distance between the nut and the bridge saddle for the high E (Em) string. This is the exact vibrating length of the string. If the holes for the bridge are not pre-drilled, the scale length value will help you position your bridge accurately and pre-drill at the right position as discussed in the bridge positioning article.
- 12th Fret Calculation Check: Measure the distance from the nut to the 12th fret and then multiply this distance by 2. This should yield the same value as the measurement from step 1 and should correspond to the scale length value provided on our product page or in the scale length table below.
Ensuring Bridge Precision
Accurate scale length measurement directly impacts bridge positioning. When marking the position for your bridge, use the verified scale length value to ensure precision. This positioning guarantees that the strings will have the correct tension, the frets will align appropriately, and your instrument will play in tune.
You can find the scale length of all our guitar kits by following this link: The Guitar Fabric Scale Length
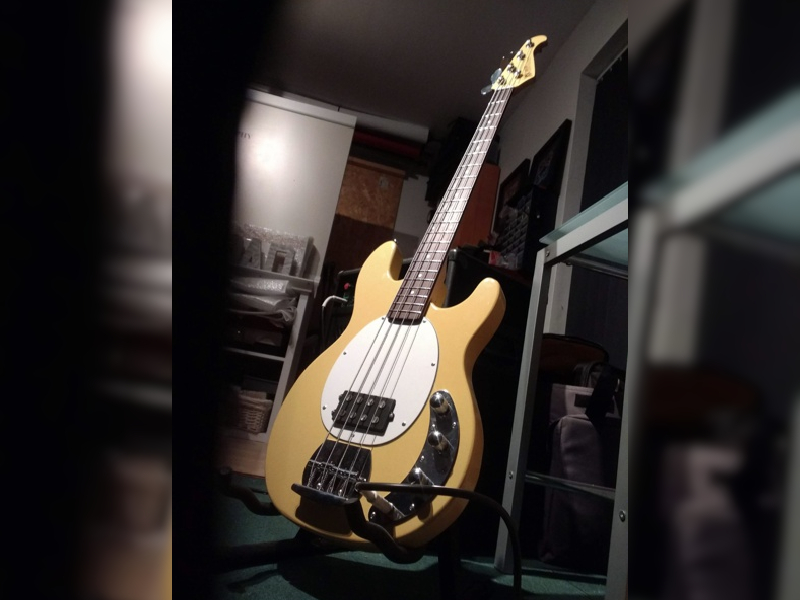
The scale length of the Rickenbacker bass kit is 864mm (34").
ASSEMBLING GUITAR: PRE-DRILLING AND SCREWING
When assembling your guitar kit's body, pre-drilling is a fundamental step that enhances flexibility and ensures secure component placement. Properly assembling the body and effectively screwing into wood are pivotal stages that require precision. This guide focuses on the pre-drilling process for your guitar body and provides insights into optimal screwing techniques.
Comments: Our kits intentionally lack pre-drilled holes—only the tune-o-matic bridge and body neck pocket are pre-drilled for simplicity. This allows for the use of different hardware or further customization of the positioning of elements like bridges and pickguards.
Why pre-drill the wood?
There are two main reasons. The first reason is to help you accurately position the components by preparing in advance where to screw and avoid mistakes. The second, very important reason is to avoid breaking the screws in the wood. This can be a significant issue if the screw breaks during the installation of a guitar part, as it can be difficult to extract. This can particularly happen when the wood is hard, such as our ash wood.
Pre-Drilling Guitar Wood Methodology
- Position your component (e.g., bridge, pickguard) onto the body.
- Lightly mark the screw locations using a pencil.
- Temporarily remove the component and utilize a hand drill to create holes at the marked spots. Ensure the drill is perpendicular to the wood surface. You can evaluate how much you need to drill by considering the screw length as well as the thickness of the part you need to screw. Then, mark this distance on your drill with tape to ensure sufficient drilling.
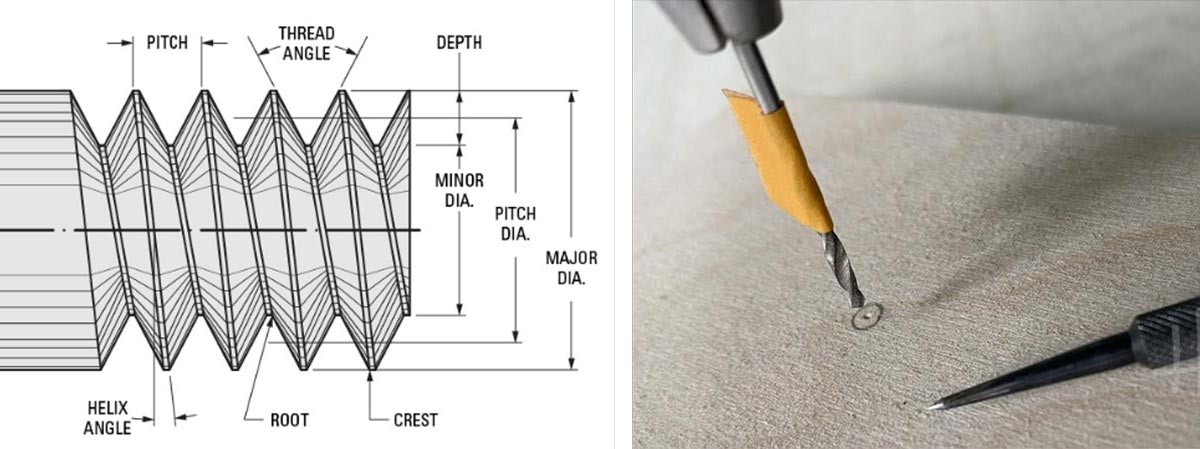
- Choose a drill bit diameter matching the body of the screw (excluding the thread). Ideally, the drill diameter should be the size of the pitch diameter and definitely not smaller than the minor diameter (see image below). For larger-diameter screws, start with a smaller bit and gradually increase to the desired size.
Comments: Pre-drilling is especially crucial for dense woods like mahogany or ash. This step prevents screw breakage and ensures a durable assembly.
Screw Insertion Techniques for Hardwood Guitar
Efficient screwing involves proper screw insertion and extraction techniques. Special attention is required when drilling, especially for hardwoods such as ash. In addition to pre-drilling the wood, which is absolutely necessary for hardwoods, you can follow these steps to reduce stress in the wood and ensure the screw won't break:
- When screwing, do it either by hand or with a drill. Using a drill will be more efficient, but make sure to set the rotational speed to a very low value, like 500 RPM.
- For very hard wood, you can use paraffin on your screw beforehand to reduce friction. Some suggest using oil, which will work, but the main problem is that it will mark your wood! Although it should be masked by the guitar part you are installing, we prefer paraffin.
- Make sure the size of your screwdriver matches the size of the screw head.
POSITIONING A BRIDGE ON YOUR GUITAR
When it comes to assembling a guitar kit, one of the critical factors that significantly influences its playability and tone is the proper positioning of the bridge. Bridge positioning affects not only the instrument's aesthetics but also its intonation, string action, and overall performance. An accurately positioned bridge ensures that each string's tension and length are balanced, resulting in better tuning stability and comfortable fretting. Additionally, precise bridge positioning contributes to even string action across the fretboard, making it easier to play complex chords. Let's review how to position your guitar bridge for optimal intonation.
Guide to Bridge Positioning
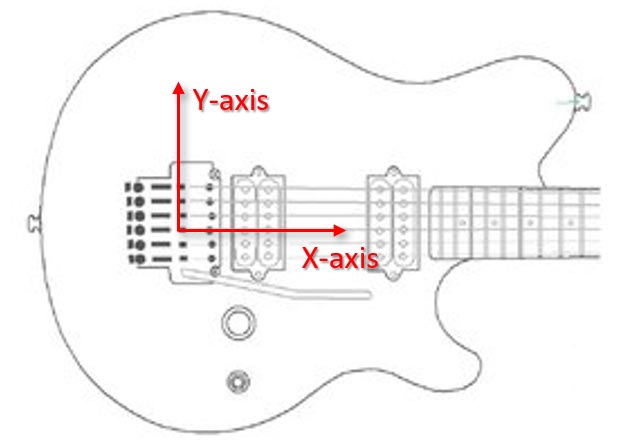
The bridge needs to be positioned both on the width and length of the body (x-axis and y-axis). To do this, you will draw different lines on the guitar. You can use masking tape upfront on which you will draw lines.
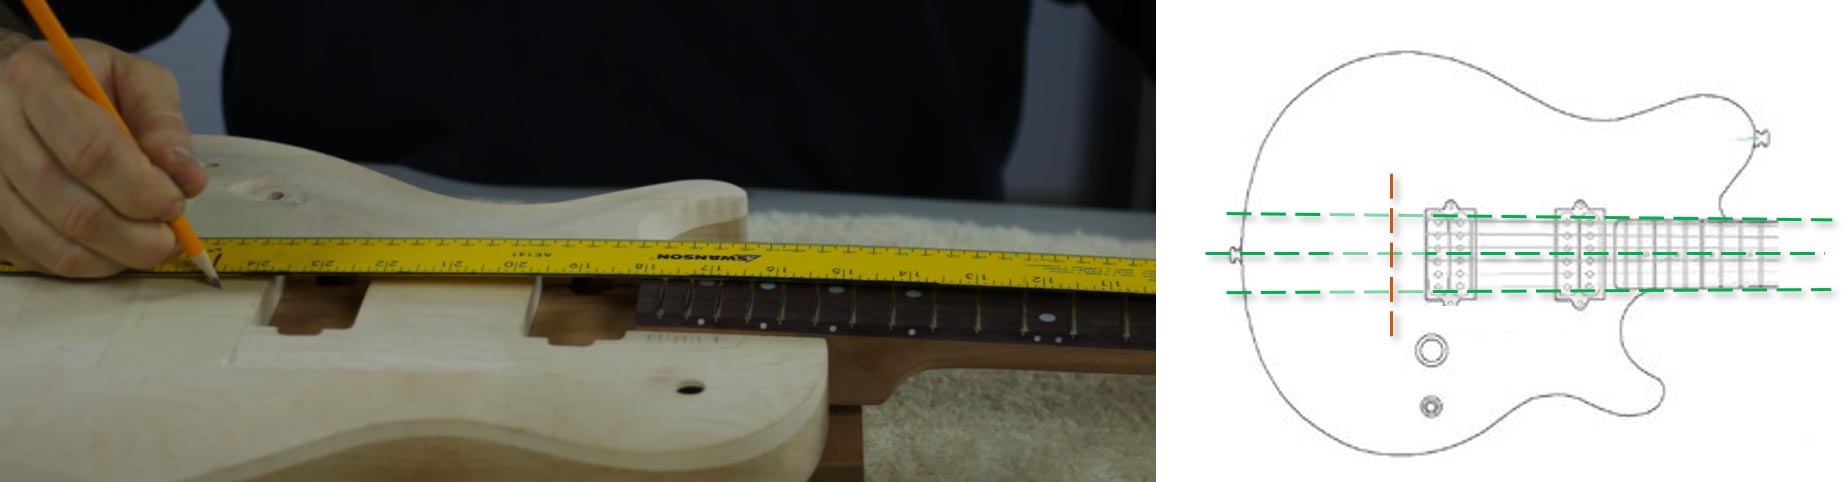
- Draw lines to center the bridge (y-axis): Install the neck (don't screw it or glue it at this point). Imagine a line extending from the neck and mark the body at the position where the bridge will be installed. Do this on both sides of the neck. Then measure the middle of both lines and trace another line. This imaginary line helps you establish the bridge's relative placement.

- Draw lines to position the bridge (x-axis, scale length line): From scale length values—review specific articles to understand and clarify the scale length value—draw a line. This line corresponds to the position of the Em slot of the bridge when the string will vibrate (again review the definition of the scale length if it's not clear to you).
- Mark where to drill and Symmetry Check: You now have the scale length and center position. However, where you drill needs to be slightly adjusted!
- On the x-axis (scale length/intonation positioning), move your guitar bridge directly on the surface and align the Em slot of the bridge with the scale length line you have drawn. From there, mark the position of the hole to fix the bridge and draw a new line. If you cannot move your bridge directly on the body surface, take the measurement from the Em slot to the hole to fix the bridge and draw a new line instead.
- On the y-axis (bridge center), you need to check the center on the bridge based on the string slot position. If your bridge isn't symmetrical, ensure that the Em (high E) string aligns correctly with the bridge. Symmetry issues can lead to uneven string spacing and intonation problems. Once the center is defined, position your bridge accordingly and mark all the holes to fix the bridge or at least the two extremes.
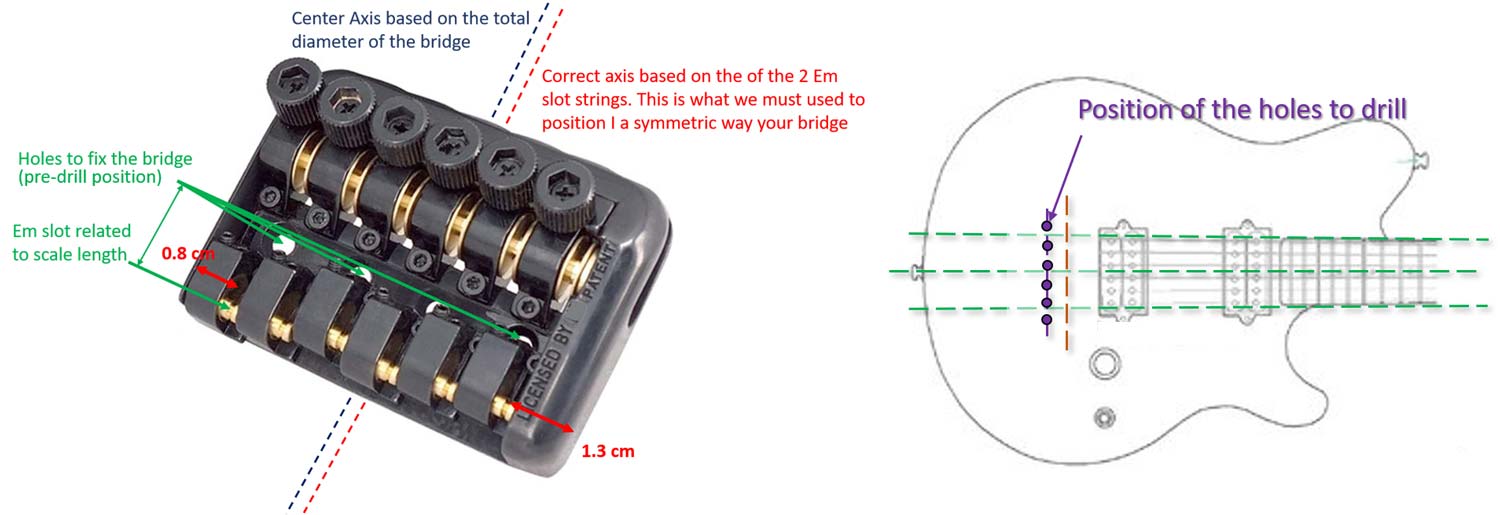
- Pre-Drill Bridge Holes: With the bridge's position marked, pre-drill the body using a drill press or hand drill. This ensures that the bridge screws will be securely anchored.
Positioning tremolo bridge on Stratocaster guitar kit
WIRING THE ELECTRONIC COMPONENTS OF A GUITAR
Properly connecting circuits ensures that your guitar produces the desired tone without unwanted interference. Let's review the process of wiring and grounding your guitar's electronics.
Electric Plug Connections of The Guitar Fabric Guitar Kits
For a hassle-free experience, the guitar kits from The Guitar Fabric use all electric plug push-type connection features to easily connect circuits altogether. This eliminates the need for soldering and streamlines the process. Connect the plugs to their corresponding connections, a straightforward task. Remember to attach the remaining ground wire to one of the bridge screws or studs, enhancing grounding without requiring soldering.

Push type connection feature
Testing the Electronics Before Installation on the Guitar Kit
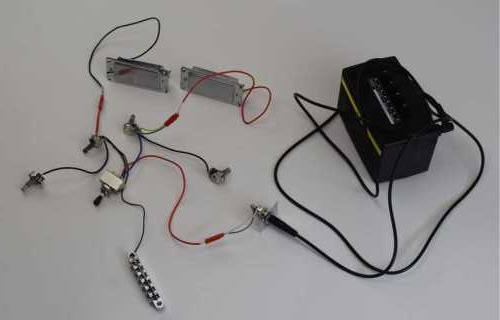
Prior to installing the electronics on your guitar kits, it is a good habit to test the electronics upfront and make sure you understand the connections, ensuring everything is working as expected. If we encounter a wiring issue when the electronics are installed in the guitar cavities, you will know it is not due to the electronic components but something else like creating an unwanted short circuit.
To test your wiring component, create the circuit by connecting the socket to the jack plug and your guitar amp as shown below. From there, try different tone, volume, and switch positions and for each case, gently hit each pickup with a metal bar like a ruler, for instance. This way, you can verify that the various components, volume, tone, switch, and pickups behave as expected.
Preventing Interference by Shielding Your Cavities
To mitigate unwanted noise and interference, consider building a Faraday cage in specific areas. Copper shielding tape is a valuable asset for shielding the pickup cavities and back wiring cavity, ensuring a clean and noise-free signal. Read our specific article on this topic.

Installing Electronics into the Cavity and Grounding
All connections can be housed in the rear cavity. Ensure that wires within the cavity are well-isolated to prevent electrical short circuits.
Routing example on the Thunderbird guitar bass: Wires should pass through pre-drilled holes associated with their components, ensuring clean cable management.
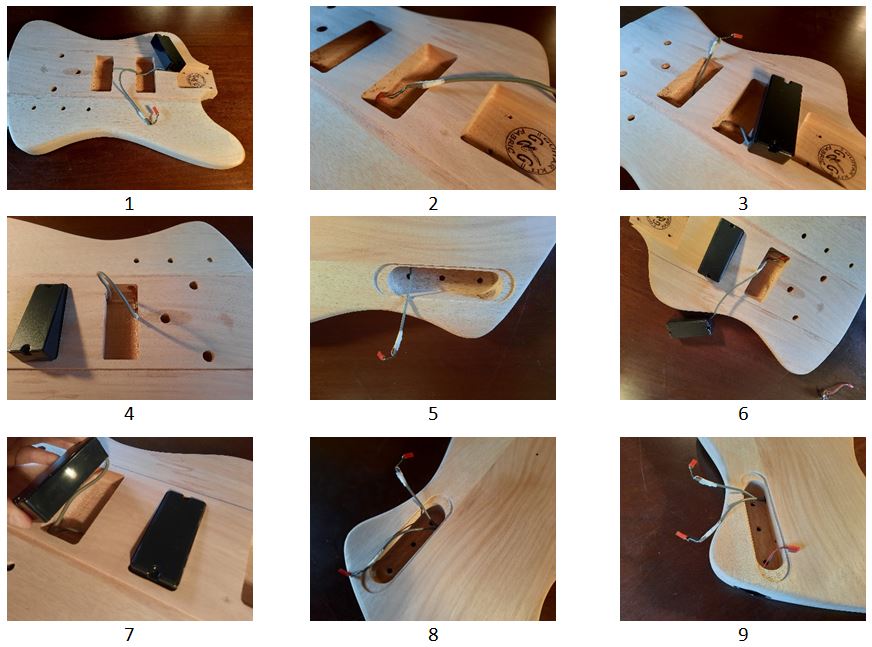
Connecting example on a Firebird guitar kit: Organize the wiring between pots, jack sockets, and pickups meticulously, while using push-type connections for a seamless setup. Be very careful that the wiring inside the cavity does not touch each other and create an electrical short circuit.
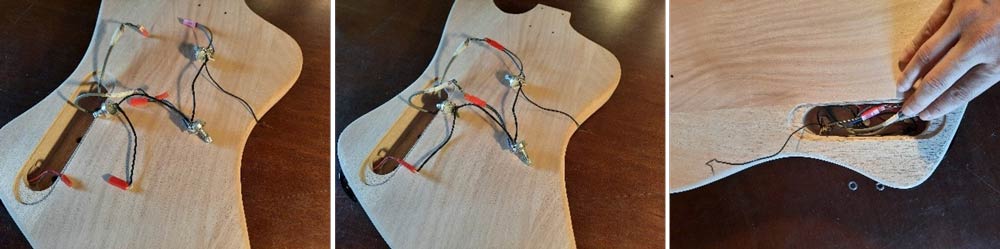
Installing wiring components in relevant holes: Install and fix the various components related to wiring, such as potentiometers, jack socket, and switch.
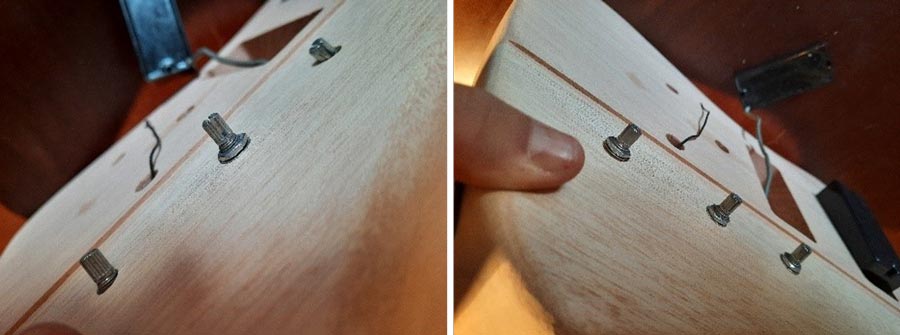
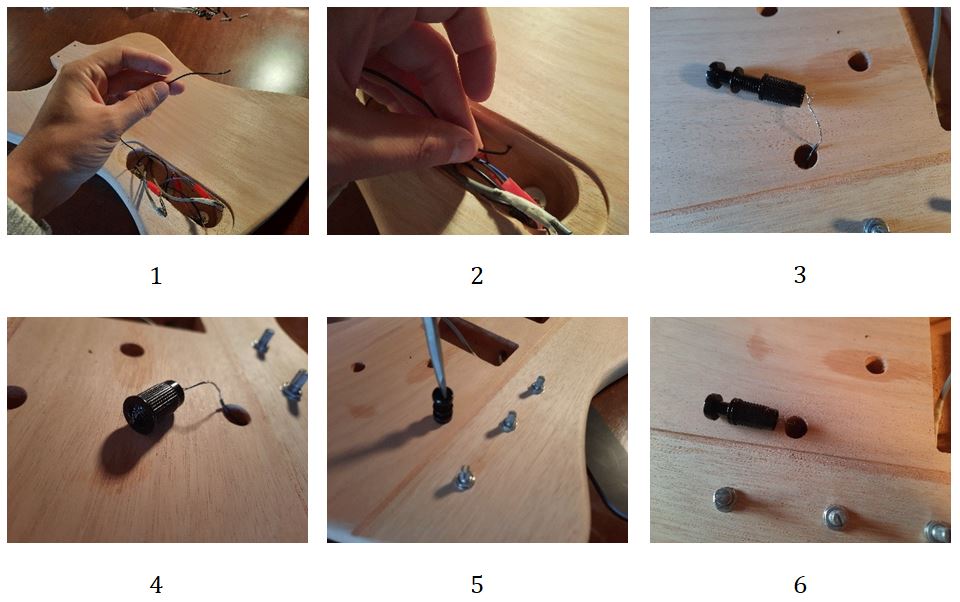
Grounding example on a Tune-o-matic bridge: Pass the ground wire cable through the hole connected to the bridge and wire it to the studs as demonstrated. Strip the wire and insert it into the stud parts.
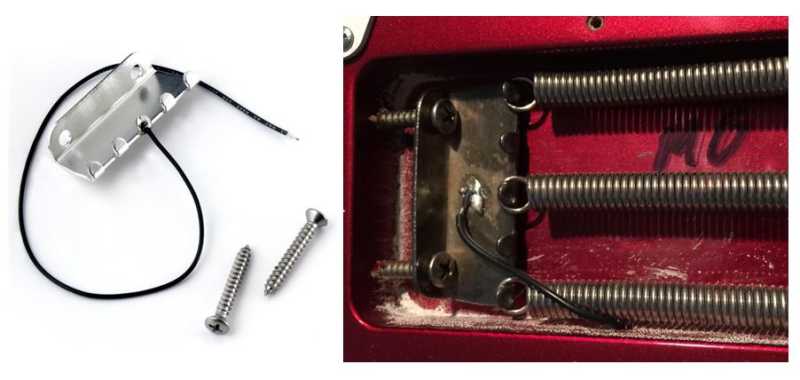
Grounding example for a tremolo bridge with springs: To begin, lay the groundwork for flawless tremolo functionality. In a Floyd Rose Bridge installation, attach spring screws within the tremolo cavity. A key step is to solder these spring screws to the ground wire stemming from the volume control cavity. This meticulous grounding ensures optimal signal integrity, preventing unwanted noise and interference while amplifying your guitar's sonic brilliance.
In conclusion, wiring and grounding the electronics of your guitar is a meticulous process. Follow the provided method to achieve optimal performance, minimize interference, and create a guitar that delivers the desired tone.
GUITAR PARTS INSTALLATION
Congratulations on nearing the completion of your guitar kit assembly! It's time to focus on the small yet impactful detail. In this guide, we'll explore the simple steps involved in adding essential components like strap buttons, back plates, and jack sockets to your guitar.
The addition of strap buttons, back plates, and jack sockets to your guitar kit is a straightforward process that brings you one step closer to enjoying your custom-built instrument. Often compared to building lego, it shall be an easy and enjoyable time where the guitar you are building start to take shape.
Pre-drill: remind that before installing any components you should have done the predrill to easily install each components and avoid breaking screws.Read specific article on predrilling and screwing.
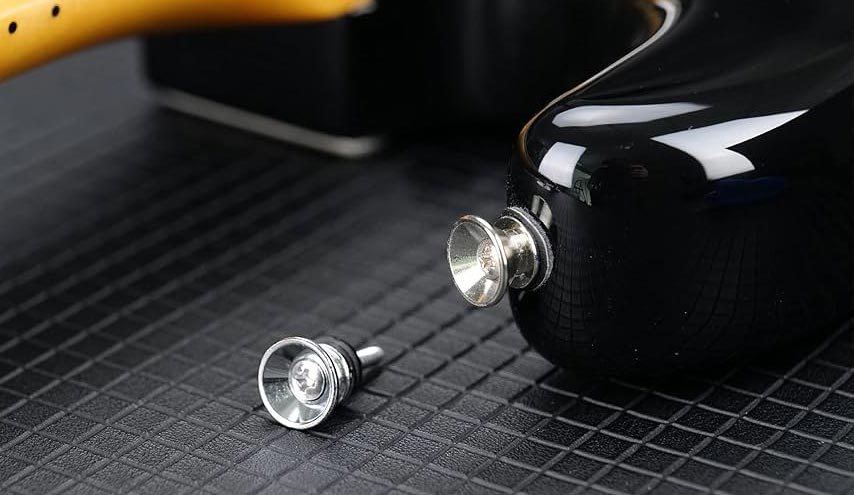
Strap Buttons: Elevate the comfort and playability of your guitar by installing strap buttons. These small yet essential components allow you to securely attach your guitar strap, ensuring stability while playing standing up.
Back Plates: Enhance the clean look of your guitar by attaching back plates. These plates cover the rear cavities of your instrument, providing a polished appearance while also protecting the internal components.

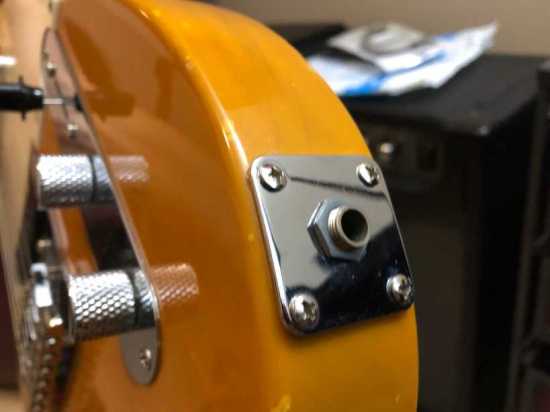
Jack Sockets: The jack socket is where you connect your instrument cable, enabling you to amplify and share your music. Installing a jack socket ensures a reliable connection, allowing your guitar to deliver its full sonic potential.
Pickups installation: Determining the correct placement of pickups in their respective cavities is essential for optimal sound and performance. If you are not sure in which cavities goes respective pickup you can look to the length of the coils screws as shown below. The largest length will go to the rear. The reason is that these screws should be below the strings and as the neck is narrower at the neck nut side... (Keep in mind that you'll fine-tune the pickup's height during the guitar setup phase).
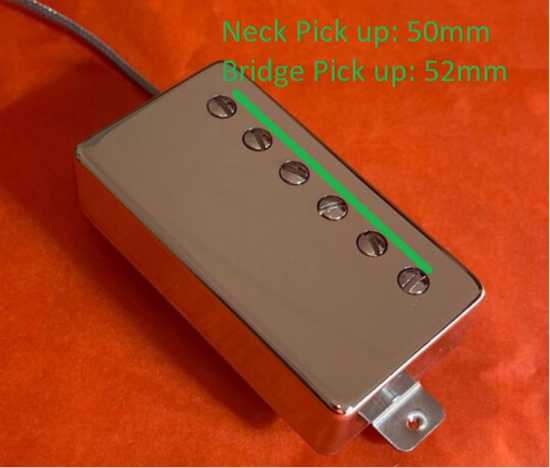
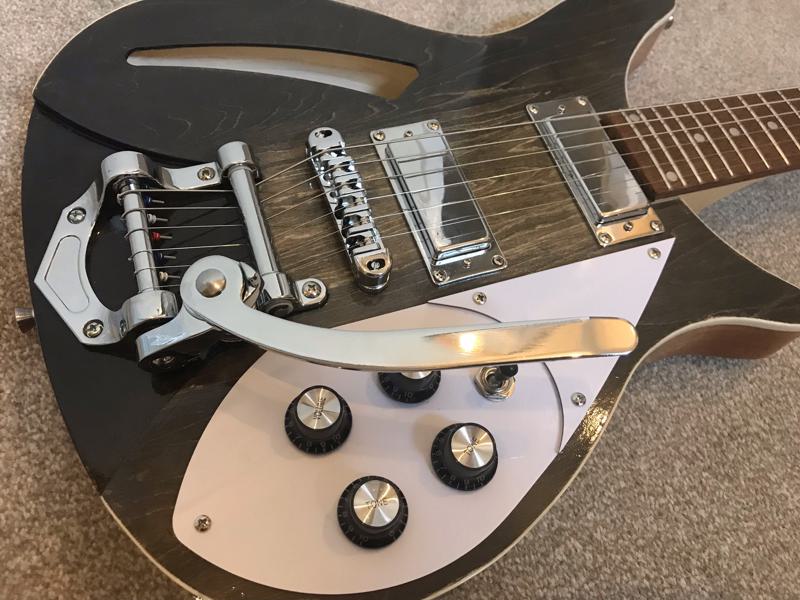
Example of humbucker pick up used on Les Paul Guitar kit, PRS guitar kit, ES335 Gibson guitar kit among other DIY guitar.
NECK INTEGRATION TO GUITAR BODY
Crafting your own electric guitar is a gratifying endeavor. Mastering the assembly and attachment of the neck is vital for a well-playing instrument. This guide walks you through the process of fitting and securing the neck into a body for both a set-in neck or bolt-on neck.
Assembling the Neck Mechanics
Creating a stable foundation is key. Follow these steps:
- Tuner Installation: Push tuners into the headstock's back.
- Bushing Placement: Attach tuner washers to bushings. Place bushings on tuner pegs. Gently tighten bushings with a 10mm spanner.
- Screwing: Secure them with provided screws.
Neck to Body Attachment: Integration Check
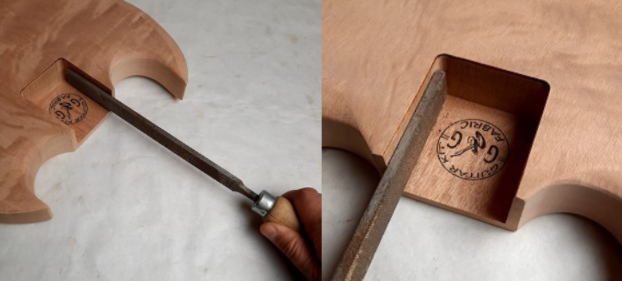
Verify Neck Heel Integration: Ensure the neck heel fits the body. File the neck pocket slightly—if required—for a perfect match. If the neck heel is slightly wider, file both sides of the neck pocket equally until a snug fit is achieved.
Neck Alignment & Inclination Check
This is a very important step, particularly for set-in necks. The alignment will ensure that the strings are all well-connected to the neck, providing optimal playability. The inclination will ensure that your string action will be correct once the guitar is finalized. Note that for string action, you will have other levers later on, such as truss rod and bridge height adjustments. It is good practice to get close to your desired string action from the start. Generally, adjusting neck inclination is not needed for most guitar kits, especially beginner and intermediate ones.
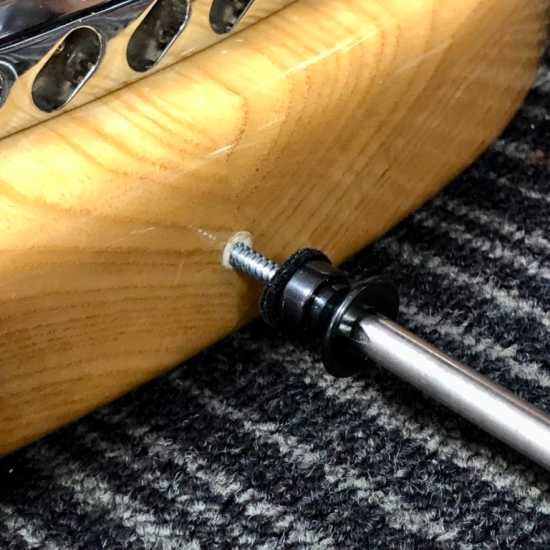
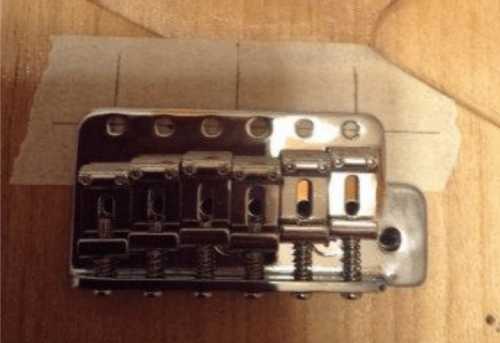
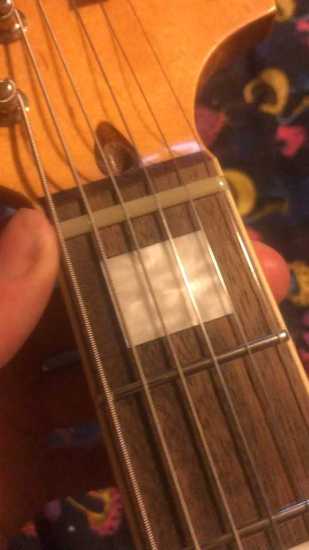
Preparation for Alignment and Inclination Check: To verify alignment and inclination, fit the neck without gluing or screwing it in. If your neck integration is good, you won't need anything else; otherwise, you can use a clamp to secure it. Then install the bridge, the two E tuners, and the pickups (you don't need to fix the components with screws). To fix the strings, you can use masking tape as shown in the image below.
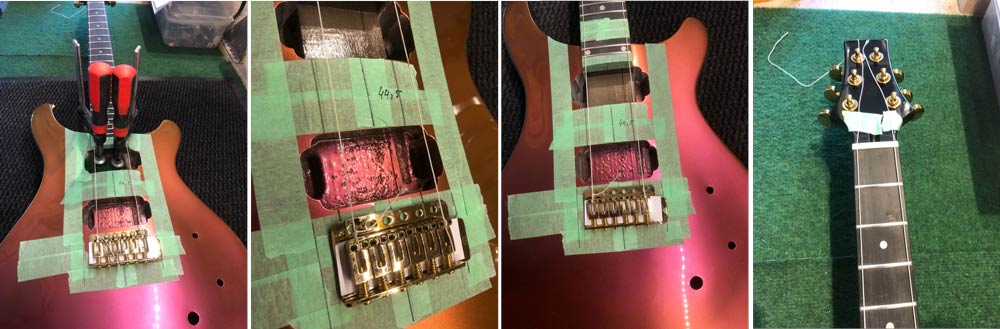
Alignment: From there, check that the strings are equally positioned on the fretboard for each E string. If you need to adjust string alignment with the fretboard, slightly move the neck within its neck pocket; if that doesn't provide enough adjustment, file the sides of the neck pocket slightly (normally, you will need less than a 1-degree adjustment). Also, ensure that the pickups can be moved to a centered position relative to both E strings.
Inclination/String Action: Measure the current string action at the nut, the 12th fret, and the last fret of the neck. Compare the string action at the last fret to your target string action. Check your string action levers: if you glue or secure the neck as it is, will you be able to easily achieve your desired string action with the other available adjustments on your guitar kit?
- If the current string action is close to your target string action, you can install the neck as it is.
- If the current string action is too high (2-3mm higher than your target), you need to increase neck inclination.
- If the current string action is too low (2-3mm lower than your target), you need to reduce neck inclination.
Methods to Adjust Neck Inclination: Sand the heel to adjust the inclination or use a shim. Sand slowly, then check, and sand slightly again if needed. Note that adding even a small inclination has a significant impact on string action. You shouldn't need to sand a lot.
Scale Length Check: If you haven't checked the scale length yet, you should do so. See our article on this topic.
Predrilling or Gluing the Neck
- Option 1, Predrilling for Bolt-On Neck: Keep the neck installed as previously and use a drill bit to mark the screw positions. It is also advised, particularly if you have a bit of inclination on your neck, to drill directly through the body predrill holes with a small drill bit (like 2mm). Then remove the neck and use a wider drill bit to finalize the neck drill. Reinstall the neck and screw it to the body with the four provided screws.
Check our guidelines regarding predrilling and screwing! Be very careful with hardwood like ashwood, as it is possible to break the screw if you don't predrill properly.

- Option 2, Gluing for Set-In Neck: Clean the neck pocket and neck heel. Use wood glue like our Titebond wood glue, applying a light but even coat on the surfaces of the heel and neck pocket that will be in contact. Ensure your neck is integrated as it was in your previous tests related to alignment and neck inclination, then clamp for 24-48 hours. Remove any excess glue if necessary.
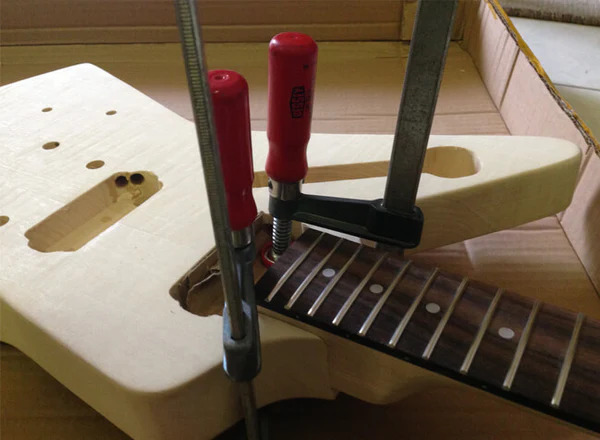
Clamping neck after gluing
Comments: For optimal gluing and sustain, you shouldn't paint the neck heel and the body neck pocket on the surfaces where the neck and body are in contact. The wood glue will perform better on wood.
GUITAR SETUP - STRING ACTION & INTONATION
Let's look into the common methods to adjust string action and intonation for a perfect guitar setup.
Understanding String Action and Intonation
Achieving optimal playability and flawless tonality hinges on mastering two key concepts: string action and intonation.
String Action: Think of your guitar as a finely-tuned instrument, with the relationship between strings and fretboard carefully balanced. String action refers to the height of the strings above the frets. This crucial measurement significantly affects your playing experience. A lower string action makes fretting easier and enables fast runs, preferred by many virtuoso players. Conversely, a slightly higher string action enhances sustain, resonance, and minimizes unwanted buzzing. Adjusting string action allows you to tailor your guitar to your playing style, creating a harmonious bond between you and your instrument.
Intonation: Imagine playing notes on different frets that sound slightly off despite careful tuning. This issue stems from imperfect intonation. Intonation is the fine-tuning process that ensures each string's pitch is accurate up and down the fretboard. Adjusting intonation involves altering the string's effective length, correcting discrepancies, and harmonizing the entire range of notes. Perfect intonation ensures chords blend harmoniously and soloists can create captivating melodies across the fretboard.
A Glimpse into the Adjustment Process
Embarking on the journey to achieve perfect string action and intonation requires understanding the adjustment mechanisms at your disposal:
- Truss Rod: The truss rod allows you to adjust both intonation and string action, primarily in the center of the neck. Positioned within the guitar neck, it manages the instrument's curvature. Adjusting the truss rod helps you balance ease of fretting with minimal buzzing. A slight tweak can significantly impact your playing style and string gauge.
- Bridge Positioning & Scale Length: When installing your bridge, checking the scale length is crucial to ensure proper intonation. Position the bridge according to the guitar's scale length. This is the initial step to ensure good intonation.
- Bridge Height Adjustment: Adjusting the bridge height can greatly influence string action. Raising the bridge saddles increases the string height, creating more space above the frets. Lowering the saddles brings the strings closer, enabling faster, more precise playing. This adjustment requires balancing optimal playability with tonal resonance.
- Nut Adjustment: Adjusting the nut is an effective way to modify string action at the first frets. File or raise the nut height to achieve the desired action.
- Neck Inclination: Before painting and completing your guitar build, assemble it roughly and check scale length and string action. Attach the neck, bridge, and 2 E strings without fixing the neck permanently. This allows you to check if your intonation is close to your desired setup. If it's off by more than 2mm, adjust neck inclination using shims or by slightly filing the neck. Perform this step gradually, as small adjustments can significantly alter string action.
- Saddle Adjustment: Fine-tuning intonation involves adjusting the individual saddle positions at the bridge. Each saddle corresponds to a string, and meticulous adjustments ensure each fret's note rings true with the master tuning.
- Fret Leveling: Although more advanced and often unnecessary, fret leveling can be useful for achieving very low string action and avoiding fret buzz. It can also improve intonation at each fret.
These are the main methods to optimize intonation and string action. Each technique is further described in corresponding articles.
For the bass electric guitar kit, the levers to adjust guitar string action and intonation are:
- The double action truss-rod on the neck
- The high-mass bridge allows adjusting string action and intonation for each string.
- The pickup height for sonority level adjustment
BRIDGE SETUP: OPTIMIZE PLAYABILITY AND SOUND
Optimizing your guitar setup can make a world of difference in your playing experience, helping you achieve perfect playability and sound. In this guide, we'll walk you through the crucial steps to fine-tune your guitar for the best performance by adjusting string action and intonation using the bridge.
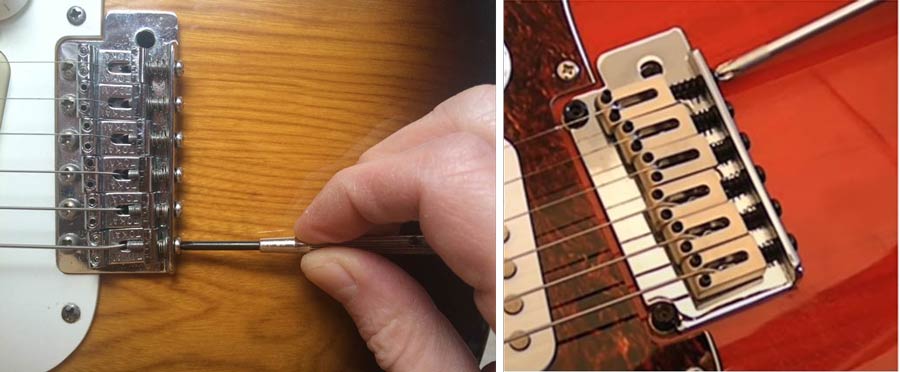
Initial Comments: 95% of electric guitars have a lever for each string to adjust intonation by moving the saddle forward or backward, and a lever to adjust the height (string action) by moving the saddle up or down. Notably, tune-o-matic, tremolo, or Floyd Rose bridges will have these adjustable levers.
Bridge Height for Perfect String Action
String action is a critical factor in determining how comfortable and responsive your guitar feels. Whether you're playing an electric or acoustic guitar, achieving the right string action is essential for playability and sound quality. Refer to our Action Level Chart below to determine the desired string action at the 17th fret for both the 1st and 6th strings. Depending on your preferences and playing style, you can choose between low, mid, or high action.

String action, in inches, at the 17th fret for the 1st and 6th string
Adjust Saddle Heights: Now, it's time to fine-tune the string action using the bridge saddles. Adjust each saddle individually to match the desired string action based on the chart. Gradually increase the action from the first to the sixth string to ensure balanced playability.
By achieving the perfect string action, you'll experience improved ease of play and sound quality, making your guitar more enjoyable to play.
Achieving Harmonious Intonation
Proper intonation is another crucial factor that can significantly impact your guitar's sound quality. Intonation ensures that your guitar sounds harmonious across the entire fretboard. Here's a step-by-step guide to achieving harmonious intonation:
Tune Your Guitar: Start by tuning your guitar to your preferred tuning.
Harmonic vs. Fretted Note: Play the harmonic above the 17th fret of the sixth string. This creates a pure, bell-like tone.
Compare Pitch: Now, compare the pitch of the harmonic to the fretted note at the 17th fret. They should match precisely.
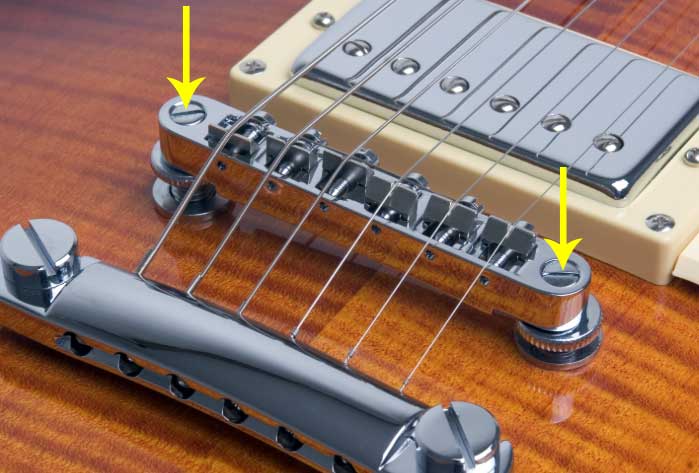
Adjust Saddle Position: If the pitch of the harmonic and the fretted note do not match, use the adjustment screws on the saddle to fine-tune the string's length. Moving the saddle slightly forward or backward will help you achieve perfect intonation.
Adjusting intonation
Repeat the Process: Repeat this process for all strings on your guitar. Ensure that each string has harmonious intonation for consistent sound quality across the fretboard.
By following these steps to optimize your guitar setup, you'll achieve the perfect balance of playability and sound quality, enhancing your overall guitar-playing experience. Take your time to fine-tune your guitar and enjoy the results in your playing.
ADJUSTING GUITAR STRING ACTION WITH THE TRUSS ROD
When it comes to achieving the perfect playability on your guitar, one crucial factor to consider is the string action – the height of your strings above the frets. If your string action is too low, you'll likely encounter fret buzz, while too high an action can make your guitar harder to play. Fortunately, there are several ways to adjust the string action, including through the use of the truss rod. In this article, we'll focus on the truss rod's role in achieving optimal string action.
Truss Rod Definition: A guitar truss rod is a critical component of many types of guitars, especially steel-string acoustic guitars and electric guitars. It is a metal rod that runs through the neck of the guitar, just beneath the fingerboard, and is used to help control and adjust the curvature or relief of the neck. The truss rod's primary function is to counteract the tension exerted by the strings on the neck, which can cause the neck to bend or warp over time due to the constant pull of the strings.
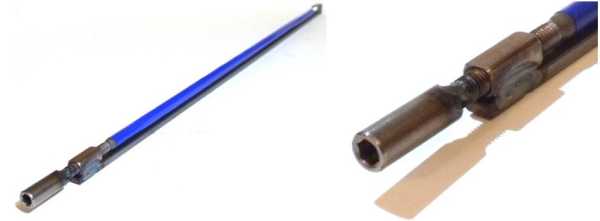
An example of a truss rod not installed on the guitar neck
Different Types of Truss Rods
There are various types of truss rods available on the market, which we can categorize as follows:
- Single Action or Double Action Truss Rods: Some guitar truss rods can only be turned in one direction, allowing you to make the guitar neck convex. Double action truss rods can turn both clockwise and counterclockwise, enabling complete adjustment to provide your guitar neck with either a convex or concave relief.
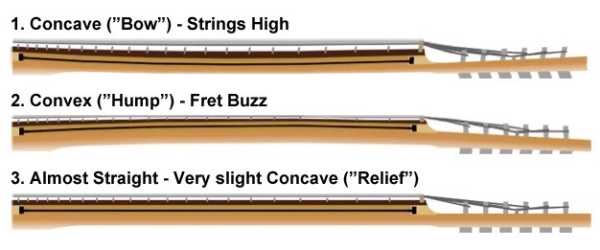
The different neck reliefs that can be achieved using a truss rod
- Neck Heel or Neck Headstock Truss Rods: The truss rod's adjustment access can be located either at the heel of the neck or at the headstock. Access at the headstock makes guitar adjustments much easier, allowing you to adjust the truss rod while the neck is attached to the guitar body.

Note that the only guitar kit at The Guitar Fabric with a truss rod on the neck heel side with single action is the Electric Parlor guitar kit.
Truss Rod Adjustment
Now, let's focus on the truss rod, a crucial element for fine-tuning your string action. Here's how to adjust it:
- Before attempting any truss rod adjustment, ensure your guitar is tuned to the desired pitch.
- Then check the neck relief. To do this, use a capo at the first fret and measure the gap between the bottom of the string and the top of the 7th or 8th fret. There should be a slight gap (about 0.010" or 0.25 mm). This can be measured with a feeler gauge.
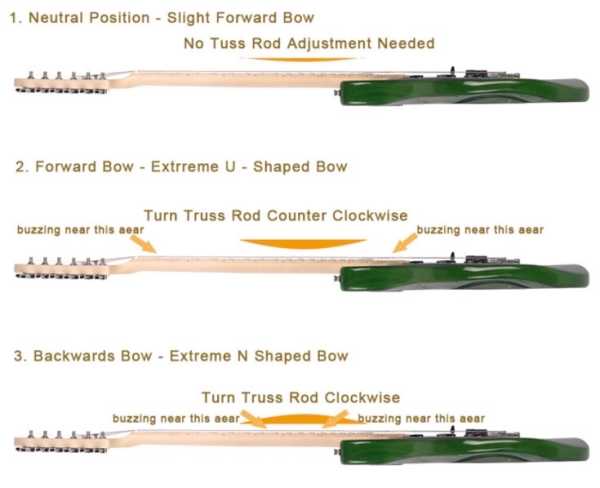
- Locate the truss rod, which is located on the headstock side or heel side, and use a wrench to adjust the relief:
- To add relief (increase the bow): Loosen the truss rod by turning the nut counterclockwise.
- To reduce relief (flatten the neck): Tighten the truss rod by turning the nut clockwise. This is where single-action truss rods are limited; they can only counteract string tension, not actively create a back-bow.
- Use an appropriate truss rod wrench or tool to turn the nut. To reduce the neck's curvature (lowering string action), turn the nut clockwise. To increase the curvature (raising string action), turn it counterclockwise.
- Make small adjustments, usually no more than a quarter-turn at a time, and recheck the string action frequently.
- It's essential to monitor the neck's response to these adjustments. Allow the neck to settle after each adjustment, which can take a few minutes.
- Re-tune the guitar after each adjustment to ensure the correct tension on the neck and check the relief again.
CAUTION: TRUSS ROD ADJUSTMENTS SHOULD BE MADE GENTLY, AS EVEN A QUARTER-TURN CAN SIGNIFICANTLY ALTER THE NECK'S SHAPE.
Adjusting your guitar's string action using the truss rod is a delicate process that can greatly impact your playing experience. By following the steps outlined in this article and exercising caution, you can fine-tune your guitar to achieve the perfect string action for your style and preference. Remember that patience and precision are key when working with your instrument to ensure the best results.
NUT ADJUSTMENT TO CONTROL STRING ACTION

In order to set up your guitar to achieve the desired string action, there are various levers you can use. One of these levers is to file or elevate the nut. In this article, we will review how to adjust the nut to either increase or reduce string action.
Understanding the Nut: A Key Component of Guitar Setup
The nut, located at the end of the fingerboard, is a critical component that influences string spacing, height above the first fret, and overall playability. Over time, the nut may require careful adjustment or replacement to address wear and tear.
Before Adjusting Your Nut
Before making slot depth adjustments, ensure the proper saddle height and truss rod settings. Note that string slots that are too deep can lead to buzzing. Adequate slot depth and width prevent open string buzzing while accommodating vibration.
If, after making other adjustments, the string action is still not to your liking, particularly near the first frets, you might want to take action on the nut. Assuming the truss rod and bridge have already been adjusted, there are two cases:
- Your string action at the first fret and below is too high: you need to the nut.
- Your string action at the first fret and below is too low: you need to elevate the nut.
Re-shaping the Nut Slot to Adjust String Action
Fine-Tuning Slot Width, Angle, and Shape: Each string slot should slightly exceed the string's diameter to prevent binding and tuning issues. Proper slot angle ensures clear sound; excessively steep angles risk premature wear. Nut height and final shape ensure the strings remain secure without excessive burial. Note that the provided strings in your guitar kit have gauges of .009 / .011 / .016 / .022 / .032 / .042 inches.
Reduce String Action: Push the sixth string down between the second and third frets. The space between the top of the first fret and the bottom of the string should be about .006 inches or just about the thickness of a sheet of paper. If the gap is wider than .006 inches, you should deepen the slot with a small needle file until it is correct. DO NOT FILE TOO DEEP!
Increase String Action: Preserving the original nut is recommended. Raising action involves laminating matching material, offering permanence and ease of removal. If the slot is too deep, you can fill the slots with a mixture of white plastic sanding dust and super glue, and then re-shape the slot.
Repeat this procedure for the other five strings. The action at the nut is either right or wrong; it is not a matter of personal preference.
Additional Comments
Securing Loose Nuts: For loose nuts, a few drops of wood glue can reattach them, ensuring easy removal if needed.
Lubricating Nut Slots: Occasionally, lubricating nut slots with white graphite reduces friction, binding, and pinging.
Removing the Nut: Before starting to remove the nut, to prevent chipping, score the paint around the nut's sides and across the peghead using a fresh X-acto blade when the finish is thick. From there, you have two types of guitar nuts that are more or less challenging to remove:
- Only one side is supported by wood (the fingerboard): Removing is simple – a gentle tap with a hammer and a wooden block often suffices.
- Nuts nestled within a channel, supported by both the peghead and fingerboard, present a different challenge. Tapping these forward risks damaging the nut and peghead veneer. Nuts seated within a channel can be coaxed out by tapping them sideways or gripping them with blunt-end nippers. Some may require creating a relief kerf or even sawing them in half to avoid damage.
In conclusion, understanding the nut's role in your guitar setup is crucial for achieving optimal playability and sound. Whether you need to adjust the string action at the first fret or address other issues like open string buzzing, the nut plays a pivotal role. Remember to fine-tune slot width, angle, and shape carefully, ensuring the right balance to prevent binding and tuning problems. When necessary, you can either file the nut to lower the action or elevate it to increase string action. Additionally, securing loose nuts and lubricating nut slots are important maintenance steps. When removing the nut, be cautious to prevent damage, especially with nuts nestled within a channel. Proper nut care is essential to fully enjoying your guitar’s potential.
FINE-TUNING YOUR GUITAR: FRET LEVELING
In the pursuit of crafting the perfect sound and playing experience, a critical step in guitar setup is often overlooked but can make a world of difference: fret leveling. Fret leveling is an advanced technique that can help you achieve impeccable playability and eliminate fret buzz.
The Importance of Fret Leveling
Frets are the metal strips on your guitar's neck that determine the pitch of each note. Over time, these frets can wear down unevenly due to string tension and playing habits. This can lead to frets that are not level, causing notes to buzz, choke out, or produce inconsistent tones.
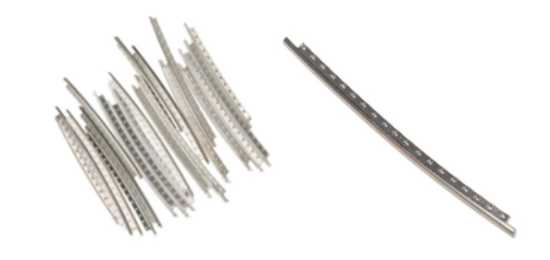
Standard Guitar Fret
Fret leveling is the process of reshaping and polishing the frets to ensure they are perfectly level, allowing for even string contact across the entire fretboard. This procedure is essential for achieving excellent intonation and playability, especially if you're striving for precision in your guitar performance.
When to Consider Fret Leveling
You may wonder when it's time to consider fret leveling. Here are some signs that your guitar may benefit from this adjustment:
- Fret Buzz: If you notice buzzing or choking out of notes, particularly when playing higher up the neck, it's a clear indication that your frets may be uneven.
- Inconsistent Action: Uneven frets can lead to an inconsistent feel when playing your guitar, making it challenging to perform smoothly.
- String Bends Don't Sound Right: If string bends result in notes that sound out of tune or muted, fret leveling may be the solution.
- Uneven Fret Wear: Visual inspection of your frets can also reveal whether they've worn unevenly over time.
Useful Tools for Fret Leveling
For fret leveling, it is important to use tools to better understand which fret needs to be leveled and by how much.
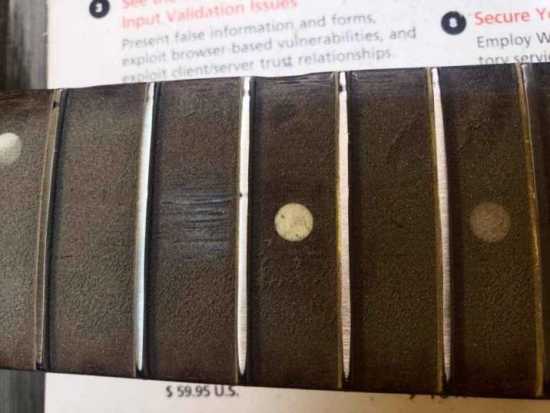
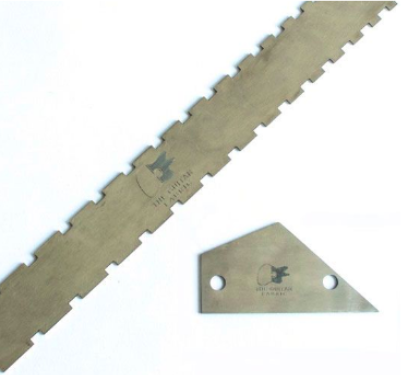
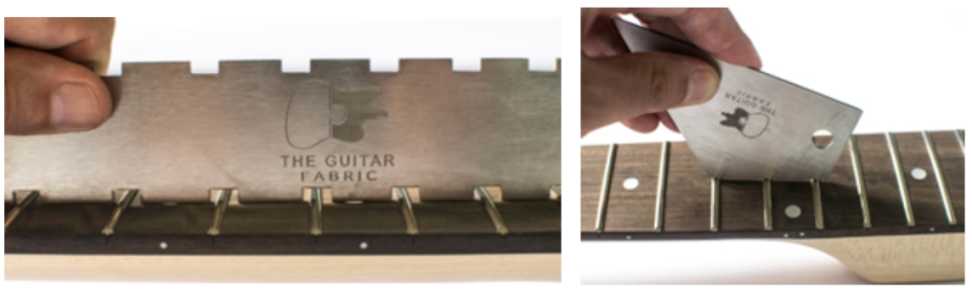
Notched Straight Edge: The notched straight edge allows you to have a global overview of your fret level for all frets. You can check which have the same height and which do not. To use it effectively, follow these steps:
- Place the notched straight edge along the fretboard.
- Check for any gaps or unevenness between the straight edge and the frets.
- Identify which frets are higher or lower than the straight edge.
Fret Rocker: The fret rocker can be used to check the level of a specific fret between its neighboring frets. It is more accurate than a notched straight edge and can be used as a second step to further refine your fret level. Here's how to use it:
- Place the fret rocker across three frets at a time.
- Rock it back and forth to detect any rocking or movement.
- If there is rocking, the center fret is the one that needs leveling.
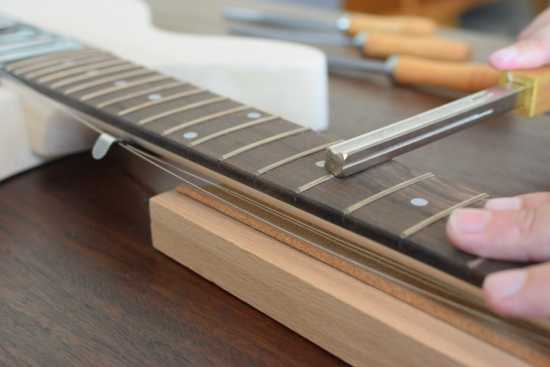
Fret Leveling Beam: This tool allows you to level the entire guitar fretboard and perform a planification.
Fret leveling beam woodworking tool from The Guitar Fabric
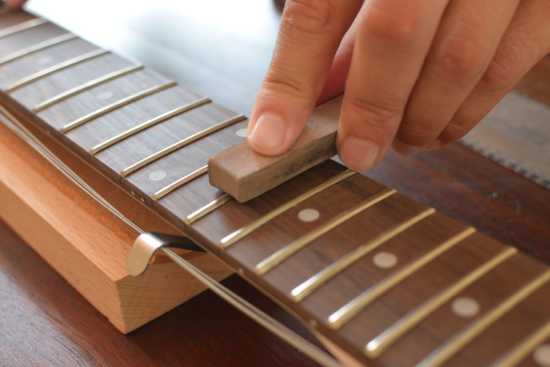
Crowning File: Crowning files allow you to reshape your frets the way you want. Here's how to use it:
- Gently file the rounded crown of each fret to ensure they have a smooth, rounded shape.
- Be careful not to remove too much material, as this can affect intonation.
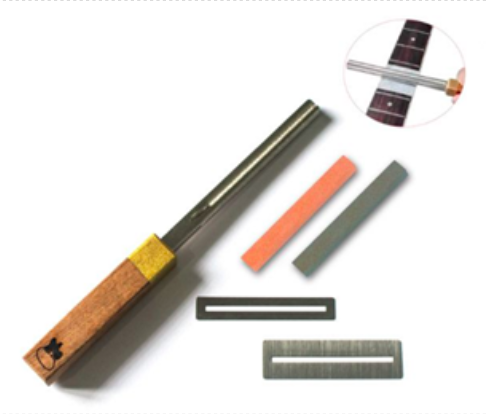
Crowning file woodworking tool from The Guitar Fabric
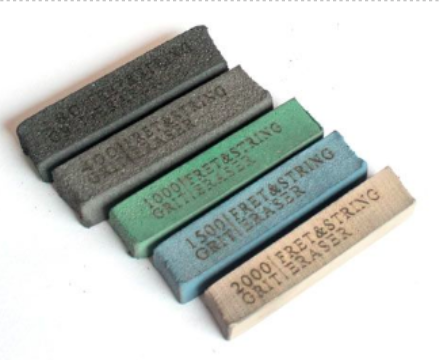
Fret Mark Eraser: If there are tiny scratches and marks on your guitar frets, a fret mark eraser can easily remove these scratches and give back the shine of your frets. You can:
- Rub the fret mark eraser along the frets to remove imperfections.
- Continue until the frets have a smooth and shiny finish.
Fret Leveling Process
Fret leveling is a meticulous process and will need some tools defined above. The process to adjust your fret level will follow these steps:
- Assessment: Identify which frets require leveling. Use the notched straight edge or fret rocker to identify uneven frets. Make a note of which frets need leveling.
Fret rocker luthier tool from The Guitar Fabric
- Filing: The high spots on the frets are carefully filed down to match the lower ones. First, secure your guitar in a stable position. Then, carefully file down the high spots on the frets, aiming to achieve an even height across all frets. Finally, use the leveling beam to refine the leveling process for all frets.

Fret leveling beam woodworking tool from The Guitar Fabric
- Re-Crowning: After leveling, the frets are re-crowned to their original rounded shape to maintain proper intonation. Use crowning files to reshape the frets into a smooth, rounded shape. Remember to maintain the original curvature to ensure proper intonation.
- Polishing: Finally, the frets are polished using a fret mark eraser or whetstone to achieve a smooth finish for optimal playability.
Fret leveling is an advanced guitar adjustment that can take your playing experience to the next level. If you're experiencing issues with fret buzz, inconsistent action, or improper intonation, it may be time to consider this procedure. With fret leveling, you can achieve fretboard perfection and unlock the full potential of your instrument.
GUITAR SETUP: PICK-UP HEIGHT ADJUSTMENT
Your guitar is more than just a musical instrument; it's an extension of your musical expression. To ensure your guitar produces the perfect sound, you need to become adept at the art of fine-tuning. In this guide, we'll focus on one critical aspect of guitar setup: adjusting pick-up height.
Why Adjust Pick-Up Height?
The pick-ups in your guitar act like the ears of your instrument, translating string vibrations into the melodies you create. To optimize your guitar's tone and volume, meticulous pick-up height adjustment is key. Before diving into pick-up height adjustment, ensure you've taken these preliminary steps:
- Position Pick-Ups: Start by positioning each pick-up at the lowest level, essentially aligning them with the pickguard.
- Selector Position: Set the selector to the position that activates only the pick-up closest to the neck. You'll fine-tune the others later.
- String Up and Tune: Install your strings and make sure they are tuned properly.
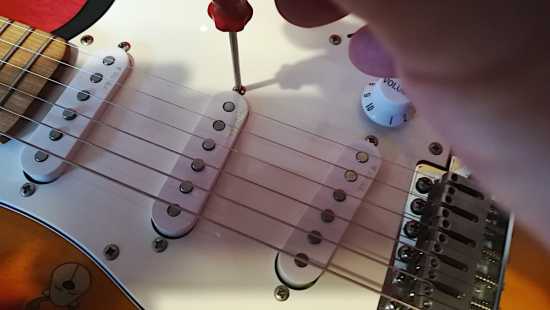
Adjusting Pick-Up Height
Now, let's get to the heart of the matter: adjusting pick-up height for the perfect sound. Here's how to do it using a stratocaster with single-coil pickups as an example. Each single-coil pickup can be adjusted on both the bass and treble sides. To start, aim for the first string to be approximately 1/8 inch (or roughly the thickness of a pickguard) above the pickup pole. Similarly, set the sixth string to be around 3/16 inch over its pole.
- Experiment: The initial measurements are just starting points. The magic happens when you experiment. Listen closely as you play your guitar, and make incremental adjustments to the pick-up height. Pay attention to the tone and volume changes as you go.
- Balancing Act: Achieving the ideal pick-up height is a delicate process. Find the sweet spot where your guitar delivers the desired tone and volume. This can vary depending on your playing style and musical genre.
- Record and Compare: Record your playing during the adjustment process and compare the results. This will help you identify the pick-up height that suits your unique style.
Enrich Your Playing Experience
Your guitar's pick-up height plays an important role in shaping your instrument's tone. By becoming skilled in this adjustment, you can tailor your guitar's sound to your preferences, whether you're strumming mellow ballads or performing energetic solos.
You should now have a beautiful and fully playable Rickenbacker bass, just as you envisioned. We hope you enjoyed the building process and are highly satisfied with your new instrument. Remember, The Guitar Fabric experts are always available to provide assistance or answer any questions you may have. We also hope you've gained valuable insights into guitar instruments and how different adjustments affect sound and playability. This knowledge will be beneficial for any guitarist in the long run.
Related Products
Related Posts
- The Guitar Fabrik
- Jun 27, 2025
- 294views
IBANEZ CUSTOM BASS SHOWCASE
- The Guitar Fabrik
- May 29, 2025
- 423views
B.C. RICH CUSTOM GUITAR SHOWCASE
- The Guitar Fabrik
- May 1, 2025
- 176views
MUSIC MAN CUSTOM BASS SHOWCASE
- The Guitar Fabrik
- Apr 28, 2025
- 725views
RICKENBACKER CUSTOM GUITAR SHOWCASE
Related Products
Recent Posts